
You are probably thinking about how to avoid the trouble of removing your fuel tank and cleaning it while it’s mounted on your car.
Removing the fuel tank is a pretty hard task and requires a certain set of tools and skills. However, there is a way to clean a fuel tank without removing it.
Key Takeaway
- First, you need to disconnect the fuel lines. Drain the fuel tank completely. Then, use a pressure washer to wash out the debris and rust. Apply a cleaning solution and leave it for a couple of hours. Rinse the tank with water and leave it to dry for 48 hours. Don’t worry if you didn’t dry your fuel tank well enough because there is a solution for that as well.
- Dirty fuel tank symptoms can include decreased fuel efficiency, engine misfires or stalling, difficulty starting the vehicle, and a noticeable fuel odor or leaks.
Dirty Fuel Tank Symptoms
- Decreased fuel efficiency
- Difficulty starting the vehicle
- Poor performance or acceleration
- Frequent stalling
- Unusual noise from the fuel pump
- Check engine light is on
- The fuel filter gets clogged frequently
- Strange odors, particularly of fuel
- Misfiring or rough idle
- Engine power loss or surging
- The vehicle won’t start
- Dark smoke from the exhaust pipe
- The car dies while driving
- Unusual fuel gauge readings
- Excessive exhaust emissions
Required Items For The Cleaning
| Item | Purpose |
|---|---|
| Instruction Manual | Guides on how to disconnect fuel tank lines |
| Catch Pan | Collects drained fuel |
| De-greaser | Used to remove grime and debris from the tank |
| Dish Detergent | Can be mixed with hot water as an alternative to de-greaser |
| Pressure Washer | Used to wash out all debris, rust, and dirt from the tank |
| Safety Goggles | Protects eyes from flying debris during washing |
| Cleaning Solution | Breaks down rust and helps remove dirt and debris |
| Gumout Fuel System Cleaner | An example of a suitable cleaning solution |
How To Clean A Fuel Tank Without Removing It

If you don’t have the time, or the skills to remove a fuel tank in order to clean it, here is how to clean a fuel tank without removing it:
Step 1. Disconnect the fuel tank lines
Cleaning the fuel tank without removing it will require disconnecting the fuel lines. This will ensure that water will not be traveling into the fuel system and all the way to the engine. Whatever you do with the fuel tank, it will drain immediately out of it.
Before starting, find the instruction manual and see how to disconnect the fuel tank lines. This step is important because fuel tank lines vary in make and model. Make sure you follow the safety instructions.
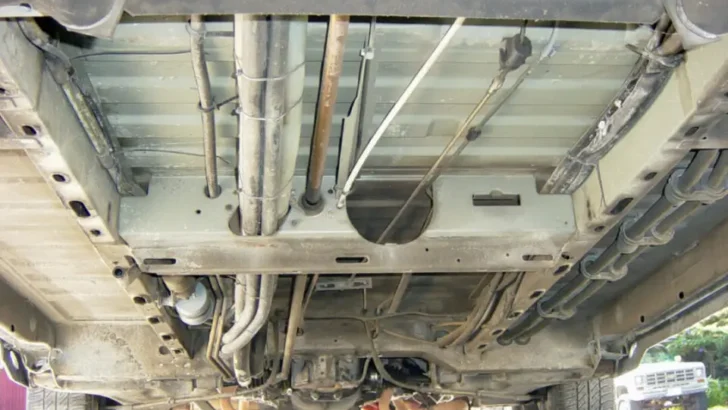
On some fuel tanks, the fuel lines are exposed. However, on some, there are fuel tank shields that you will have to detach first.
These are usually held in place by two bolts on each side. After you remove the bolds, safely drop the fuel tank shield. At this point, the fuel lines should be exposed. Disconnect them and tape them off so no dirt will get in them.
Step 2. Drain the fuel tank
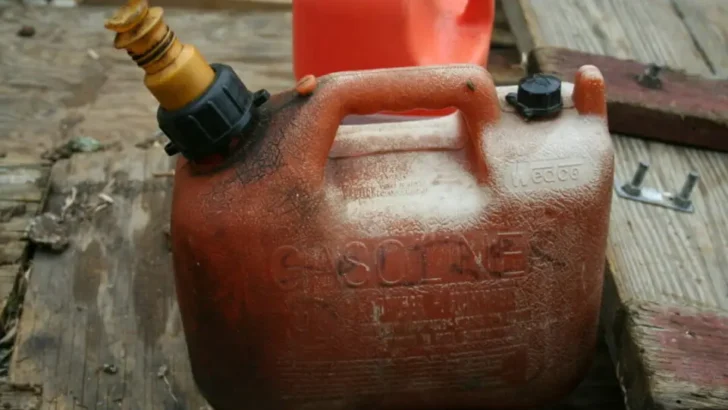
When you disconnect the fuel lines, whatever is in the fuel tank will drain. In this case, it will be the gas. So, make sure that you have a catch pan placed underneath the fuel tank so the fuel can safely drain into it.
I prefer cleaning my fuel tank when the fuel level is low. I avoid doing it with a full tank because I just don’t have enough containers for the fuel.
So, drive your car around to spend the fuel and when you only have a little left, drain it by disconnecting the fuel lines. You can also jack your car from one side so the fuel can drain better from the tank.
Step 3. De-grease your fuel tank
After you drain your fuel tank, it is going to smell of gasoline. Also, the dirt and debris inside the fuel tank will still be there.
De-greasing your fuel tank will agitate the gunk, grime, and debris and they will fall out much easier when you pressure wash the fuel tank. You can use a commercial de-greaser or mix some dish detergent and hot water. Leave this mixture in the tank for 24 hours.
Step 4. Pressure wash your fuel tank
After the de-greasing process is done, you need to wash your fuel tank with water. Use a pressure washer to wash out all the debris, rust, and dirt from the tank.
Try to point your sprayer at various angles inside the tank so you can remove the rust from the fuel tank walls. Make sure you are wearing goggles as debris may get into your eyes.
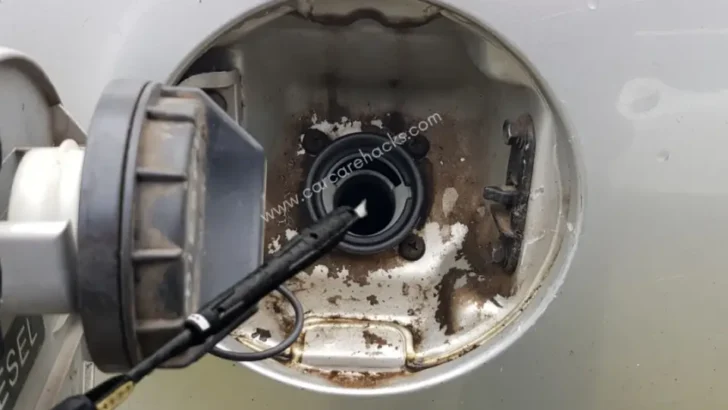
Step 5. Adding a cleaning solution
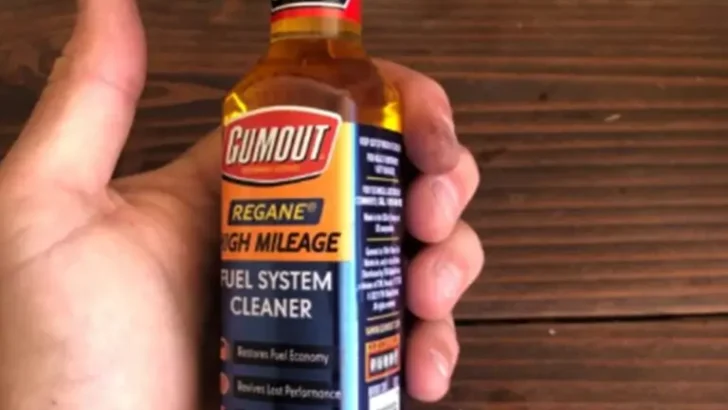
Your fuel tank probably has grime or rust in it. For this, you will need to use a cleaning solution. The chemicals from the cleaning solutions will break down the rust. After applying the cleaning solution, you will be able to wash off the dirt and debris easily.
I found this , and to be honest, I am pretty satisfied with the results. This product has cleaning agents that tackle any grime and gunk buildup within the fuel tank. This is what I am using, but you can use any other cleaner that you think will work for you.
Step 6. Leave the tank
You need to allow the cleaning solution to sit for a couple of hours. I left my tank for 5 hours total. After that, I was able to remove the rust and sludge very easily. If you don’t have much free time, I think that leaving it for 2 hours will do the job.
Step 7. Rinse the fuel tank
Rinse the fuel tank with a pressure washer or a garden hose. The key here is to remove as much grime and dirt from the fuel tank as possible. Do not worry about the cleaning solution. If you do not manage to remove it all, it will get sent to the fuel injectors and will get burned off with the rest of the fuel.
Step 8. Dry the fuel tank
After you are done with cleaning, you need to leave the tank for 24-48 hours to dry. Make sure your fuel tank is dried completely. You do not want to leave water in your fuel tank.
Again, after it is dried, make sure there is no smell of gasoline. If there is no smell of gasoline, that will be a great indicator that you have successfully cleaned your fuel tank.
I Didn’t Dry My Fuel Tank Enough
If you didn’t leave your fuel tank long enough to dry and install it back on, water in your fuel tank can cause you some problems. You will immediately experience symptoms like trouble with acceleration or changes in speed. There are two ways to fix this issue. The first one is to drain the entire volume of gas from the fuel tank.
This step requires time and money. The second step is to use a fuel additive made for removing water. There is a product called HEET (Check the current price on amazon.com) which absorbs the water from the gas. This product will help you if you only have less water than fuel in your tank. If you have more water and less fuel, this product will not work.
How Often Should The Fuel Tank Be Cleaned?
Car fuel tanks often become dirty due to their high exposure to dirt, sand, and other particles. This usually happens when vehicles drive on unpaved roads that are in need of repair.
Dirt and road grime can get drawn into the fuel tank by the suction that is created as a vehicle speeds down the road. This dirt can cause damage to the internals of the engine, reducing its efficiency and even causing it to break down sooner than expected.
It’s important to clean your fuel tank periodically as a part of regular maintenance – at least once a year. A dirty fuel tank can lead to rust and corrosion, so getting rid of the gunk in there is key to keeping your car running smoothly.
Cleaning a car fuel tank can be daunting, however, there are several steps you can take to ensure a successful cleaning.
Firstly, it is important to assess the type and condition of the contaminants in your fuel tank, as different substances will require different methods of removal.
If the contamination consists mainly of rust or sediment, the use of highly concentrated de-rust agents or petroleum-based solvents should successfully target any debris.
You could consider agitating the tank with an electric drill adapted with a wire brush attachment to speed up the process.
However, if your car has more serious issues such as gasoline varnish residues or sticky sludge that even solvent treatment does not resolve, then a more aggressive approach may be necessary; this could involve using specially formulated fuel tank cleaner combined with vacuum extraction to thoroughly purify the inside of the tank.
When To Clean the Fuel Tank?
It is important to clean the car fuel tank when there are signs of contamination or clogging.
Contamination can be caused by dust, dirt, and debris in the air entering the fuel tank.
Clogging can occur due to sludge buildup inside the fuel tank over time. Both of these issues can cause poor engine performance and should be avoided at all costs.
Cleaning a fuel tank typically involves draining old fuel from it, flushing out any contaminants, and then replacing the new fuel with fresh gasoline.
If you notice any signs of these problems, it’s best to take your vehicle in for service as soon as possible so that these issues can be addressed before they become major problems.
Some warning signs that indicate an issue may include the car not starting, poor fuel mileage, the fuel tank not filling up, or a decrease in performance.
Best Products For Cleaning Fuel Tanks

Here are some fuel tank cleaning solutions that my friends and I have used that actually works. If you wish to read a more detailed product review on fuel tank cleaners, check it out here.
3. Star Tron Gas Tank and Fuel System Cleaner
This cleaning solution will remove the sludge and deposits from gasoline. It is safe to use for any tank, including polyurethane. I do have a more detailed product review which you can check out here.
2. Evapo-Rust Pail Rust Remover
This cleaner is safe on the skin, biodegradable, and contains no acids. Do not dilute with water.
1. Red Line Fuel System Cleaner
This product contains synthetic upper cylinder lubricant. Use the whole bottle for the best results.
Moving on. After cleaning your tank, you need to check your fuel pump and fuel filter. If your tank needs cleaning, there is a high chance that your fuel pump and filter need cleaning as well.
How To Know If My Fuel System Needs Cleaning?

The fuel system plays a key role in your car. But how would you know if you are having a problem with your fuel tank or fuel pump? Here are some warning signs:
- If your vehicle sputters at high speeds, there might be something wrong with your fuel pump. This happens because the pump is struggling to supply the engine with fuel.
- If your car temperature rises up and the car stalls, this may be because of your fuel pump. If this happens, your pump might be starting to deteriorate and will need to be replaced or cleaned.
- Check your fuel pressure gauge and the owner’s manual. See how much pressure a properly operating pump should be exerting versus what your pump is currently exerting. Anything less than what the owner’s manual says is a sign that your pump needs to be replaced or cleaned.
- When your car is under stress it might show some symptoms. If you are driving up a hill or trying to accelerate fast and your car engine turns off, this means that your fuel pump is not supplying a steady stream of fuel to the engine.
- If your car starts to use more gas than usual. When the fuel pump is about to fail, more fuel than necessary flows into the engine system. So if there is a difference in the gas mileage, this might be a signal.
- If your engine won’t start, and there is nothing wrong with your ignition or battery, meaning, your engine cranks and revs but won’t start.
If you have any of the signs that I mentioned above, now it’s time to clean the fuel pump and filter. First, you need to remove the filter, and here is how:
How To Remove Your Fuel Filter
- Find the fuse for your fuel pump and remove it. After that, start your engine and let it run for 2 minutes. If your car shuts down before the 2-minute mark, no worries, this means that the pressure is relieved.
- Turn off your car and remove the negative terminal on your battery. Secure the cable so it doesn’t come into contact with the terminal by accident.
- It’s time to locate your fuel filter. Location of the fuel filter by make and model. It will say in the owner’s manual. But it should be anywhere between the engine and the gas tank.
- Jack up your car.
- Detach the fuel lines from the filter. Place a bucket beneath the filter to catch the fuel.
- Use a wrench to remove the fuel lines and remove the filter from the bracket.
How To Clean Your Fuel Filter
If there is any gas left in the filter, make sure you pour it out. For the next step, you will need a pressurized carburetor cleaner.
Spray the filter with the cleaner and leave it to sit for 2 hours. If there is debris, tap it out and leave the filter to dry for an hour. After cleaning, put the filter back into the bracket.
Reconnect the fuel lines and lower your car. Reconnect your battery and start your engine. Your car should now run smoothly. If you notice a fuel spill, you need to check your fuel lines and secure them.
BONUS: Why You Shouldn’t Drive With Your Low Fuel Light On
It has happened to all of us. That yellow annoying light just keeps on turning on. No matter the gas price, some drivers cannot afford to have a full tank all the time.
There was a survey made back in 2015 that showed that almost 800,000 drivers ignore their fuel lights. But driving with your fuel light on may lead to some issues that will hurt your wallet.
Top mechanics recommend that you should keep your tank no less than 1/4 full. Why is that? The fuel gauge isn’t very accurate, to begin with.
It should be considered an estimate, not an exact measurement. Running on low gas can damage your car, your catalytic converter to be exact.
Also, the gas acts as a coolant for the electric fuel-pump motor. So driving with low fuel allows the pump to suck in more air creating more heat which will lead to a damaged pump.
Not to speak about running out of fuel. This is pretty annoying and I hate it when I ran out of fuel. So trust me, it’s better to have your tank at least 1/4 full at all times.
FAQs
Can bad gas ruin an engine?
Yes, bad gas can indeed ruin an engine. Fuel quality is critical for the proper and efficient functioning of a car engine. If the fuel is contaminated or old, it may not combust properly, leading to poor engine performance.
How often should I clean my fuel tank?
The frequency of fuel tank cleaning depends largely on the quality of fuel you use, your driving conditions, and the specific recommendations of your vehicle’s manufacturer. However, as a general rule, most experts suggest that you should clean your fuel tank every 5 years or 50,000 miles, whichever comes first.
How long can you leave vinegar in a gas tank?
The duration for leaving vinegar in a gas tank can vary based on the severity of the rust or grime inside the tank, but generally, it is advised to let vinegar sit in the tank for about 12 to 24 hours. Vinegar, being a mild acid, is effective for breaking down rust or mineral deposits.
What is the best thing to clean out a fuel tank with?
For general cleaning, a high-quality fuel system cleaner can be an effective choice. These cleaners are designed to break down deposits and contaminants in the fuel system, including the fuel tank. They’re easy to use – simply pour them into the gas tank and let the vehicle run so the cleaner can circulate through the system.
For rust specifically, a mild acid like vinegar can be effective. Fill the tank with vinegar and let it sit for 12-24 hours (depending on the severity of the rust), then thoroughly rinse the tank with water.
In Conclusion
In conclusion, cleaning a fuel tank without removing it is a complex process that requires careful attention.
The process involves running a fuel system cleaner through the system, emptying the tank, and then refilling it with fresh fuel.
This method can help to remove debris and deposits within the tank and the fuel lines. However, for severe cases of contamination or if the tank is rusted, professional help may be required.
Always remember to prioritize safety when dealing with fuel systems, and don’t hesitate to seek professional assistance if you’re unsure about any part of the process.