
The Triton Ford 5.4 vacuum hose diagram provides a visual representation of the vacuum hose layout for the engine. It serves as a guide for proper installation and maintenance.
Understanding this diagram is crucial for the efficient performance of the vehicle. When maintaining or repairing a Triton Ford 5. 4 engine, having a clear understanding of the vacuum hose layout is essential. A vacuum hose diagram aids in locating, identifying, and replacing hoses accurately, ensuring optimal engine performance.
This guide will explore the significance of the vacuum hose diagram for Triton Ford 5. 4 engines, providing insight into its crucial role in vehicle maintenance and repair. Understanding and utilizing the vacuum hose diagram is paramount for ensuring the engine’s efficiency and longevity.
Understanding Vacuum Hoses

Vacuum hoses in your Triton Ford 5.4 play a crucial role in maintaining the vehicle’s performance. They serve to control the vacuum that flows between various components of the engine, ensuring efficient operation.


These hoses are responsible for maintaining the balance of pressure within the system, allowing for optimal functioning of the engine. Without these hoses, the engine may experience performance issues and inefficient fuel consumption. It is important to regularly check for any leaks or damages in the vacuum hoses to prevent any potential problems that could arise from a compromised vacuum system.
Triton Ford 5.4 Vacuum Hose Diagram
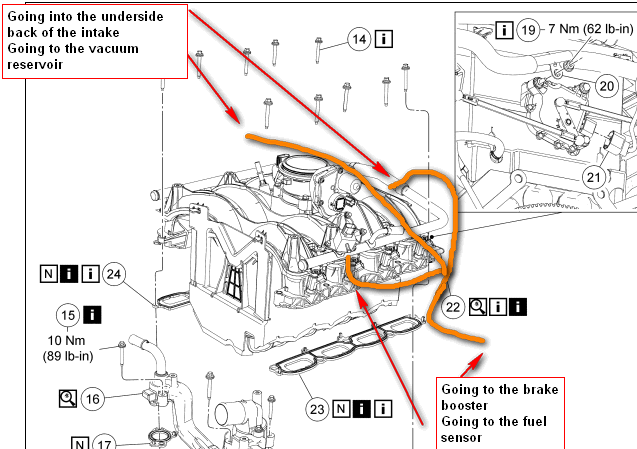
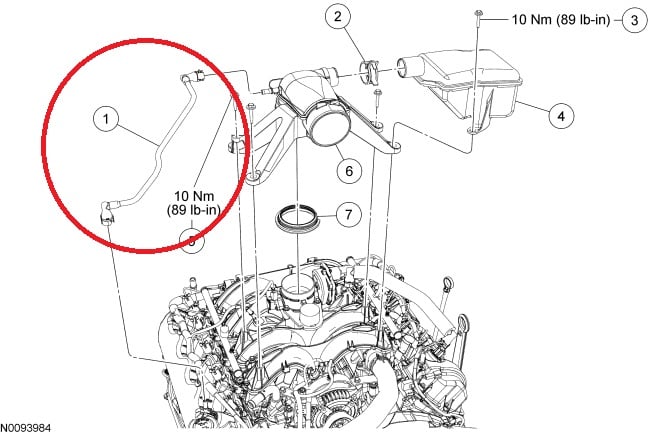
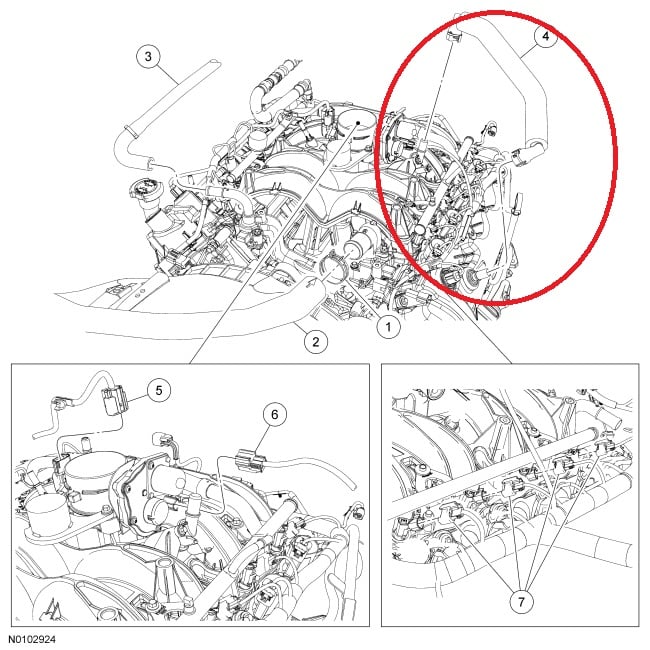
The Triton Ford 5. 4 Vacuum Hose Diagram provides a clear visual guide for locating and connecting vacuum hoses in the vehicle. This diagram simplifies the process of troubleshooting and maintaining the vacuum system, ensuring optimal engine performance.
| Overview of the Diagram |
| The Triton Ford 5.4 Vacuum Hose Diagram displays the layout of different vacuum hoses. |
| Each hose is marked for easy identification and connection purposes. |
| For instance, hoses for brake booster, PCV valve, and intake manifold are typically depicted. |
| Utilizing this diagram helps in troubleshooting vacuum system issues effectively. |
Engine Issues And Symptoms
Engine issues can be a cause for concern for any vehicle owner. A malfunctioning vacuum hose can lead to various signs and symptoms that indicate a problem. These signs include poor acceleration, rough idling, low fuel efficiency, and unusual engine noises. It is crucial to pay attention to these indicators as they can have a significant impact on the overall performance of the engine. A vacuum hose plays a vital role in maintaining the correct air and fuel mixture, ensuring proper combustion within the engine. Any leakage, blockage, or damage to the hose can disrupt this process, leading to reduced engine power and efficiency.
By diagnosing and resolving vacuum hose issues promptly, you can prevent further damage and costly repairs. Regular inspection and maintenance of the hoses are essential to ensure their proper functioning. If you notice any of the mentioned symptoms or suspect a problem with the vacuum hose, it is advisable to consult a professional mechanic to identify the issue and take appropriate measures.
Steps To Fix Vacuum Hose Issues
| Tools Required: | Socket set, screwdriver, pliers, replacement vacuum hose |
Step-by-Step Process: Start by locating the damaged vacuum hose. Remove the hose using the appropriate tools. Next, compare the new hose to the old one for the correct size.
Cut the replacement hose to match the length of the old hose. Attach one end of the new hose to the vacuum port. Secure the other end to the corresponding component. Test the vacuum system to ensure proper functioning.
Maintenance Tips For Triton Ford Engines
Regularly inspect vacuum hoses to ensure they are intact and free from cracks or leaks. Replace any damaged hoses promptly to prevent engine performance issues. Additionally, check hose connections for tightness and secure any loose fittings. For preventive maintenance, consider regularly cleaning the engine compartment to avoid debris buildup that could block the hoses. Proper care of vacuum hoses can extend the life of your Triton Ford engine and minimize the risk of mechanical problems.
Frequently Asked Questions
How Do I Know If My Vacuum Hose Is Bad?
To determine if your vacuum hose is bad, check for these signs: repeatedly clogging, losing suction power, cracks or splits in the hose, and unusual noises or smells.
What Should Vacuum Line Hoses Be?
Vacuum line hoses should be in good condition, free from cracks or leaks, and properly connected to ensure optimal performance. Regular inspection and maintenance of these hoses is essential for efficient vacuum system operation.
What Is Vacuum Hose On Intake Manifold?
The vacuum hose on the intake manifold helps regulate air distribution, fuel combustion, and engine performance. It plays a vital role in maintaining efficient engine function.
What Size Is Ford Vacuum Lines?
Ford vacuum lines typically come in various sizes ranging from 3/16 inches to 5/8 inches in diameter.
Q: How Does Triton Ford 5.4 Vacuum Hose Diagram Work?
A: The Triton Ford 5. 4 vacuum hose diagram shows the routing of the vacuum hoses to ensure proper engine performance.
Conclusion
Understanding the Triton Ford 5. 4 vacuum hose diagram is crucial for maintaining optimal engine performance. With the detailed diagram provided, troubleshooting and fixing vacuum-related issues becomes seamless. By following the diagram’s guidance, you can ensure a smooth-running engine and prevent costly repairs down the line.
Happy driving!